The XLS 10-Subject Grader
The XLS 10-Subject Grader is a spreadsheet that can be opened and used with a compatible spreadsheet program that must be on your computer. I do not provide the software.
Important Points to Know Before Downloading the Grader
- The XLS 10-Subject Grader is designed for one student.
- The grader supports up to ten subjects
- The grader is designed to hold up to 180 grades per subject. [read more about the term intervals]
- The grader does not support weighted grades. In other words, all scores entered into the grader are given equal value in the average scores. I have other graders that support weighted grades.
The Grader File - Choose One
Below are the files. Choose the one that is compatible with your spreadsheet software. The choices are XLSX and XLS. In order to use the grader, it must be downloaded and saved to your computer's hard drive.
XLSX - Microsoft Excel 2007 and newer
![]() XLSX 10-subject Grader
XLSX 10-subject Grader
Right-click and choose Save * as. Save the file to your hard drive.
Tip:
Name the file something meaningful, such as: john-2011-12 [child's name and school year]
XLS - Microsoft Excel 2003 and older
![]() XLS 10-subject Grader
XLS 10-subject Grader
Right-click and choose Save * as. Save the file to your hard drive.
Tip:
Name the file something meaningful, such as: john-2011-12 [child's name and school year]
How to Use The Grader
Before setting up the grader, it is okay to enter some sample scores to test the grader and to get an idea of how it works. Testing the grader in this way can also show you if the grader will fulfill your requirements. You can delete your sample data later.
Enter the Student's Name
The grader is meant for one student. Type the student's name, grade, and year in cell D1. See image below.

The Subjects
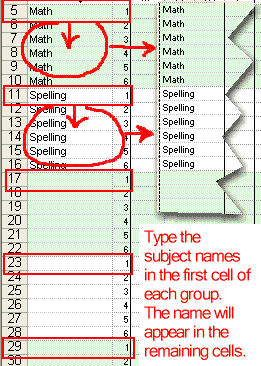
To the right of the subject name cells are the numbers 1-6; type the subject name ONCE in each cell that is next to the number 1. The grader is programmed to automatically enter the subject names into the other cells.
 If you need to enter a different subject for the second semester do the following:
1. Unprotect the worksheet
2. At the subject that you wish to change -
3. Remove the formula that is next to the number 4 in column A. As far as the grader is concerned, the second semester begins at #4 for every subject.
4. Protect the sheet after you are finished because It is easy to accidentally remove important formulas. The most important formulas are in the yellow cells.
I do not fix broken spreadsheets .. DY
REF --> "References"
If you need to have a means to reference any of the grades, use the reference row to set up the ability to have a way to map the grades.

1st - Add The Column Reference Characters: To use the reference row, add your choice of characters: symbols; letters; or numbers across the top. These letters or numbers identify which column the grade is in.
2nd - Add The Row Reference Characters: In the space next to the numbers 1-6 (in column B) enter a character, preferably a letter, in front of each number. The letter may indicate the subject - See image below.

Referencing (Mapping) the Scores: Pair the Row and the Column references.
Example: As shown in the image above, the first subject is
Math.
1. Notice that the letter "m" has been written next to
each number in column B.
2. Also notice that numbers have been written across the top in the REF--> row.
3. Notice the scores that are red in the image above.
The reference numbers of the red grades are: m1-5 and sp1-5. The purpose of referencing
grades is that (if) you need to make a note of the source of the grade on your planner. Typically this note would be entered with the lesson plan from which the score was earned.
Adding Grades
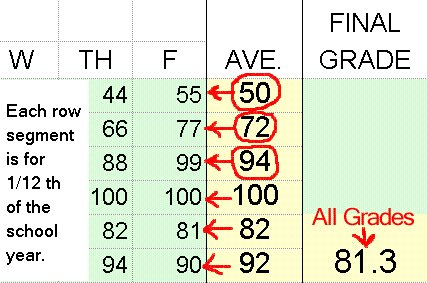
See image below. Add grades in whole number form (76, 99, 100, etc.) in the cells shown below in the image. The grades are averaged at one-twelfth school term intervals and the current total grade average.

The grader has Monday-Friday indicators across the top, BUT that does not mean you must add a score that was earned on a Monday in a column labeled "M." As far as placing scores, it matters more to place scores based on a span of weeks or based on a school term. Each school term on this grader is three weeks or one-twelfth or the school year, so the grades placed in one row are grades that were earned sometime during that one-twelfth school term.
Understanding the Grade Averages
The Term Intervals - Timing the Grade AveragesEach row segment between the subject name and the yellow grade average cell represents 3-Weeks or a term that could be defined as 1/12 of your school year. Each one of these row segments contains 15 cells for scores. At the end of each row segment is a yellow cell that will calculate a stand-alone average for that row segment - and ONLY for that row segment. The next yellow cell does not include the average from the previous yellow cell. The ONLY average that gives the full average is the one under the column labeled Final Grade. The final grade average averages ALL grades for one subject and each time a new grade is added, the final grade average could change.  It will not hold still, it will not give you a stand-alone 2nd quarter [only] average. It gives the TOTAL grade average.
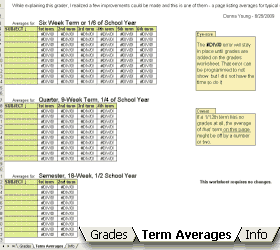
As one who homeschooled, I know that many of you will want combined term averages, so I have added a worksheet to this grader that calculates several term averages - "Term Averages" is the name of the worksheet.
 Term Averages will show you the "stand-alone" average grade for the terms:
- Every six weeks or 1/6th of school year
- Each quarter or 1/4 of the school year
- Each semester or 1/2 of the school year
Stand-Alone Average Grade: An average of grades that a student earned during a block of time. The stand-alone average does not include grade averages that were earned outside of the block of time.
Donna Young, June 25, 2009
Hello Visitor!
I am currently working on this website to add to its ginormousness. Thank you for visiting, and please subscribe yearly to access my many printable files! Donna Young
May 13, 2021


 Color Names: Tracing, Coloring, Writing


