Preparing a Garden - Double Digging
Double Digging
Double digging is a labor intensive way to prepare a garden bed for planting. It is also a time honored way to prepare a garden bed for planting. Double digging improves soil aeration and drainage and, if you add compost, improves soil texture.
The image above shows a well dug row that is raised. Double digging raised it some, taking some soil from the path raised it a little more. And, of course, compost was added to the dirt.
These are the tools and items that are needed for double digging:
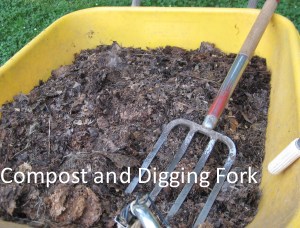
- Shovel
- Digging fork
- Wheel barrow that contains compost
- An old towel, or a small tarp, or piece of plastic (something large enough on which to place a few shovel full's of dirt)
- (optional) Any necessary soil amendments
Soil Amendments
To find out it your soil needs any minerals, take a soil sample to your local "Cooperative Extension" [ http://www.csrees.usda.gov/Extension/ ]. To be honest, I have never had my soil tested, but then I've lived and gardened in the same general location of the world since I was 9 years old and I am familiar with the soil here.
 How to Double Dig
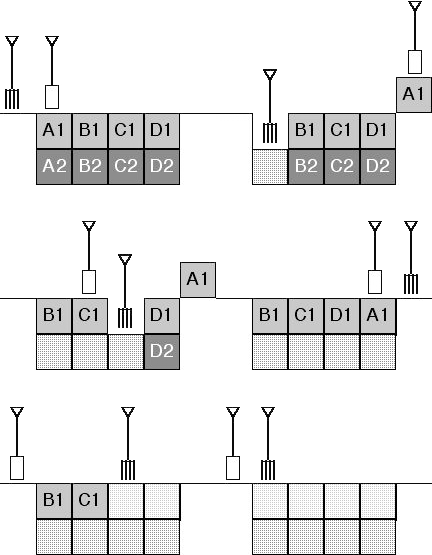
The image shown here on the left is an animation showing the basic steps of double digging. The soil is shown as "cut away" -- you are looking at the soil from the side, not from above. The blocks that are labeled with the number 1 represent the top soil ( the upper layer that you are going to remove or shift). The blocks that are labeled with the number 2 represent the dirt that is under the top soil or upper layer. OR you can think of the #1's as the first shovel depth and the 2's as the shovel depth that is underneath.
 When double digging be mindful that you do not mix the top soil with the sub soil!
The image is animated, but I am going to break it down and tell you about the steps. You will see that it is repetitive. One more point for you to know - Double dig in a specified area, say, for instance, a row that is 2 feet wide by a length that you think you can manage to complete for the time that you have on the day that you start.
Illustration 1
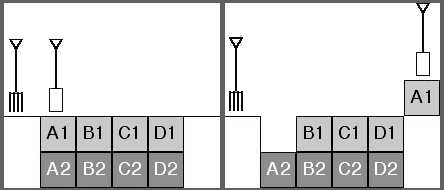
Illustration 1. A1 is removed and set aside. The soil from A1 can be placed on a towel, a small tarp, or a piece of something.
Illustration 2
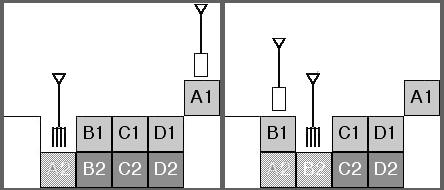
Illustration 2 -
1. Loosen the dirt in A2. Add compost and mineral amendments (if needed) to the dirt in A2.
2. With the shovel, move the dirt from B1 and place it in A1's spot.
3. With the fork loosen the dirt in B2. Add compost and mineral amendments (if needed) to the dirt in B2.
Illustration 3
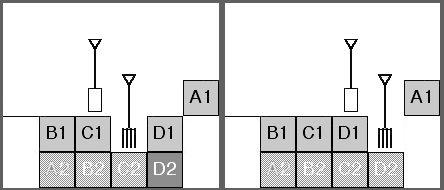
Illustration 3 -
1. With the shovel, move the dirt from C1 and place it in B1's spot.
2. With the fork loosen the dirt in C2. Add compost and mineral amendments (if needed) to the dirt in C2.
3. With the shovel, move the dirt from D1 and place it in C1's spot.
4. With the fork loosen the dirt in D2. Add compost and mineral amendments (if needed) to the dirt in D2.
Illustration 4
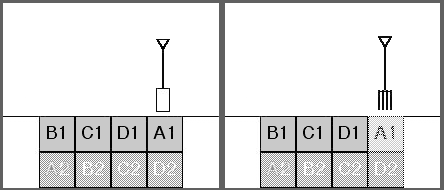
Illustration 4 -
1. With the shovel, move the dirt from A1 and place it in D1's spot. - This completes dirt removal.
2.With the fork loosen the dirt in A1. Add compost and mineral amendments (if needed) to the dirt.
Illustration 5
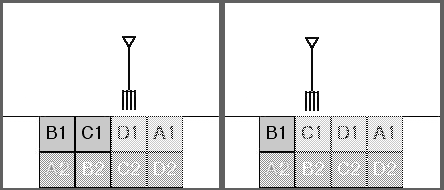
Illustration 5 -
1. From this point on, loosen the dirt in the remaining top spots, D1, C1, and B1, add compost and mineral amendments (if needed) to the dirt.
Illustration 6
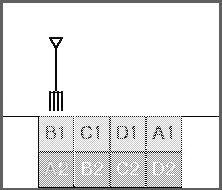
You are finished double digging this row. The next step is either moving to another row to double dig, stopping for the day, or raking this row smooth to ready it for planting.
 There is no need to double dig garden paths.
Regarding paths: Some of the soil from paths can be removed and placed on the double dug rows to make them even more raised.
 Do not let anyone walk on your double-dug rows!
Make sure everyone knows where they are and to keep off of them.
You are at DonnaYoung.org, online since 1998. Thank you for visiting my website. Donna Young


 Cover Sheets
 About Keys