Snowflakes and Math
 Snowflakes can generally be described as hexagons since they typically have six sides, but remember, that is not true all of the time. Snowflakes can be lopsided; they are not always symmetrical. In this lesson, we will attempt to make a symmetrical snowflake with six sides.
Skills Addressed
- A circle is 360° and one-sixth of that is 60°.
- How to find the center of a symmetrical shape.
- How to make a rectangular piece of paper square without a ruler.
- A protractor use
- Designing a snowflake
- Some coordination with the scissors
- Following instructions
- Being precise [marking and folding]
Supplies for Making a Paper Snowflake
 Web site with images of Real Snowflakes and Snowflake FAQs

- Paper *see note
- Scissors
- Pen or Pencil
- Protractor
* Note: The snowflake will be 6 layers thick when cut. Make sure the paper thickness is not an issue with either the scissors you are using or the age group of the kids doing this project. Test-cut six layers of the paper you are considering before settling on a certain type of paper. Construction paper is probably okay for older children who have experience with real scissors; otherwise use thinner papers such as printer paper or coffee filter paper.
Optional Decorating and Hanging Supplies
- Glue and Glitter or Glitter Pens
- String or Thread & Needle
- Tape [if hanging hole needs reinforcement]
Step One: Make the Paper Square
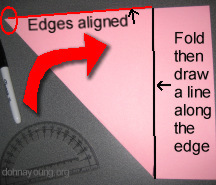 Lay the piece of paper on a table or flat surface.
Fold one corner up at a 45° angle. Make sure the fold will be at the corner of the paper (circled in red in the image).
Carefully line up the side of the paper with the top of the paper. When the paper is aligned, press the along the folded edge with your fingers. You need to make a crease on this fold.
With your pencil or pen, draw a line along the edge of the paper. If you have never done this before, do it slowly. Use the paper's edge as your guide. 
Open the paper and cut along the line. Your paper should now be square [or square enough].
Step Two: Find the Center of the Square
The crease that you made in step one is part of the process of finding the center of the square. Normally one would just fold the paper again, making another crease from corner to corner on the paper, but since we are not making a four or eight sided object, we will not do this because a second crease from corner to corner will not help us in making a 6-sided object.
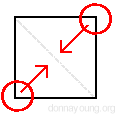 The first question I have is: Can you see the crease that you made in step one? If not, fold the paper along the crease and press along the crease. If the crease is visible, we can proceed.
There are at least two ways to find the center of a symmetrical shape by folding and this is one of them. I should admit that this is the harder of the two.
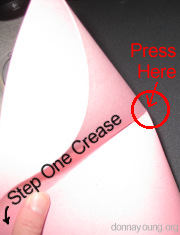 Pick up the corners of the paper that have not been creased and bring them together making them meet. Hold the corners between your finder and thumb. With your other hand, press on the paper along the step one crease, working your way up to find the middle of the paper.
 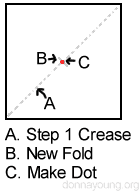 When you reach the end of the fold, press down on the one spot at the step one crease. DO NOT MAKE another crease along the entire fold! Make a small new fold that crosses the step one crease.
Open the paper and find the new fold and make a dot where the step one and step two creases meet with your pen or pencil.
Step Three: Marking the 60° Intervals with a Protractor
A circle is 360°. The snowflake we are making has six equal sections. 360° divided by 6 equals 60°
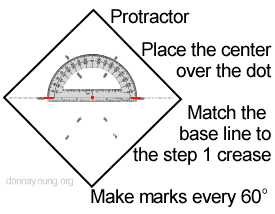 Place your protractor on the paper. Align the protractor based on the crease and the dot.
Line up the protractor's 0° line to match the step one crease.
Place the protractor's center mark over the center dot that you made on the paper in step two.
Make marks every 60°. Flip the protractor over (if it is like the one in the image) and mark the other side. The 60° marks are the fold lines.
Step Four: Fold the Paper
Now we can fold the paper. 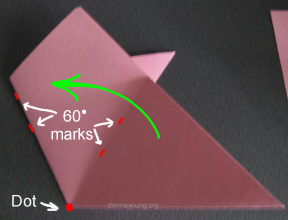
- Fold the paper in half diagonally along the same crease line that you made in step one.
- Take note of the center dot and one set of 60° marks. Fold from the center dot along the 60° mark.
- Turn the paper over and fold from the dot and the set of 60° marks. [shown in image]
- Now you should have a folded paper that resembles a tulip.
Step Four: Trim and Mark on the Snowflake Form
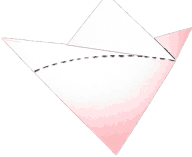 1. Trim: The paper's corners should be trimmed off. The corners are the protruding edges. This part does not need to be precise. The image shown gives the general idea of the part to trim. The trim line can be straight or a slight arc as shown in the image.
2. Mark a center reference line: Fold the top layer in half lengthwise, then unfold. With a pencil, draw lightly along the crease. This line represent the center of each "petal" of your snowflake. The image below at step five shows the crease.
Information: At this stage, the paper has 6 layers. That is almost too many layers when using thick paper and that is why we stop folding at this point. If your paper is very thin, see also the aluminum foil snowflake below.
Step Five: Snowflake Design, Keep it Simple
Please visit the snowflake image web site if you need to see actual snowflakes.
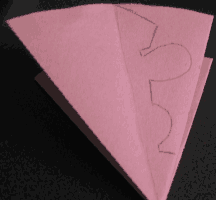 If you want to make a symmetrical snowflake draw one-half of the snowflake design on the form.
Cut along the line so that it is in one piece.
Because it should be cut into one piece, the design should be made simple.
Step Six: Tracing & Cutting the Other Side
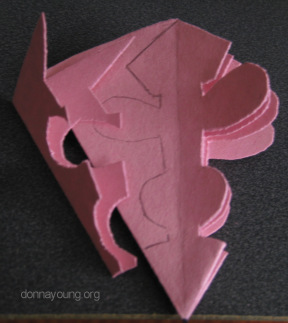 Lay the cut out part on top of the other side of the "petal" and trace around it and cut.
This time you do not have to keep it in one piece.
 After you have cut along the line of your design, carefully unfold your snowflake.
Step Seven: Decorate and Hang Your Snowflake
Optional: Decorate your snowflake with the supplies that you have. If you display your snowflake, run a string or thread though one of the "petals" to prepare it. If the paper is flimsy, reinforce the string hole with a small piece of tape.
Glitter

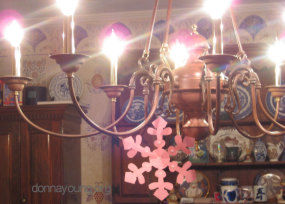
Oh Look! It's a Giant Pink Snowflake
 That's all for the paper snowflake but then I thought I'd try this with aluminum foil. Aluminum foil is quite flimsy, so I backed it with a piece of waxed paper and I added a big piece of clear packing tape to the center of the aluminum foil because a lot of folding goes on at the center point.
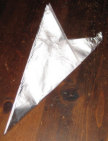 Because aluminum foil is thin, I folded the snowflake form one additional time to make 12 layers not counting the waxed paper, so in all, there were 24 layers, 12 of foil and 12 of waxed paper. The image shows what it looked like with the additional fold.
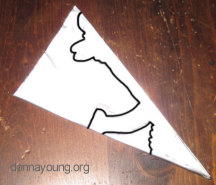 Drawing a design on the snowflake form is next. This time, because it is folded one extra time and has 12 layers, the form shown is one-half of the snowflake "petal." When envisioning the design, be sure to account for that important fact! [that this is 1/2 of the petal] See image on the left and notice that one side of the design is high and one side is low. The low side represents the sides of the petals and the high side is the top center of each petal.
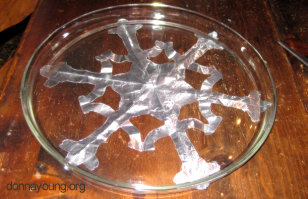 After cutting out the design, carefully open the snowflake, coaxing the edges open. The waxed paper helped, but some edges were stuck. The snowflake was intact, but flimsy - very flimsy! In the following moments after making this flimsy thing, I decided on a use for this particular snowflake. I placed it under a clear glass serving tray that stays on my table. It'll be safe there for a little while.
Donna Young, December 18, 2009
 Other Crafts at Donna Young.org
Paper Crafts
Crafts: Ornaments
- Styrofoam Balls and Buttons Ornament
- Beaded Icicle Ornaments
- Bear-in-a-Bag Christmas Ornament
- Lollipop Tree Ornaments
- Pipe-Cleaner Candy Canes Ornament

 WOW! a Purse-Sized Calendar Booklet!